Who doesn't want their shanty to be a bit savvy, a bit clever, creative, a bit sensible, sharp and ingenious?! But hey, let's face it, most of us are living on a shoestring. Here's how I'm doing it my way, making our nest a Savvy Shanty.


Tuesday, June 28, 2011

Our House..In the middle of the Street...Our House

A face lift is exactly what our sweet home needed. She just didn't represent from the outside what is happening inside. There was no life, dull and drab. I can't blame anyone, I picked the colors when we built her. Not sure what I was thinking, oh wait I was making nine hundred and fifty two decisions, guess I was thinking safe. Who knows? But no more, people, now she is a happy house!

A very happy house with a pretty door. And lovely flowers. And I just love her!

And here is the before. Good luck finding the front door. Or noticing that we had any brick.


Enjoy,
ginger

Monday, June 20, 2011

Cool treats for Hot Nights!


Blackberry Lemon Basil Icecream!

So Big Daddy and Miss Priss were out for an evening stroll around the neighborhood and came home with a cup full of blackberries. All excited they requested something yummy made from these little ripe jewels. Well I make a blackberry basil butter for our grilled peaches and figured it would translate well to icecream. Off I went in search of a recipe.

I came across this one featured on http://www.flouronmyface.com/
The link to the recipe link is as follows.

The icecream was scrumptious! Now I will tell you that I only had regular basil and not lemon basil and couldn't find lemon basil at the grocery store and it still turned out yummo!

Sure do love those summer time treats!

Enjoy,

ginger

Monday, June 13, 2011

Vintage Bowling Pins...err...kinda

Don't you just love these vintage bowling pins! Love the patina, the chipped paint. Can't you just imagine all the years spent at the bowling alley, all the first dates there, all the last dates there. The popcorn, the drinks, the funky shoes that lots and lots of strange feet have been in. Man, if only these could talk! The stories they would tell.
Well, I have a little secret I'm gonna let you in on. They aren't exactly vintage. And they have never spent a night in a bowling alley. But..... and this is a big but... they did spend about a year or so outside in my back yard. And I do know their past. They were born in Target all shiny and new. Then they were given as a gift to my daughter. And well, you know how kids are...the rest is history. A few years left laying around under the deck and wa-la! Vintage bowling pins! Well, if five years counts as vintage, then they are totally authentic!

Now they hold a place of honor as a little summer decorating on my dining room table. Light, casual and little quirky.

Enjoy!

ginger

Friday, June 3, 2011

Light on the Wallet Letters

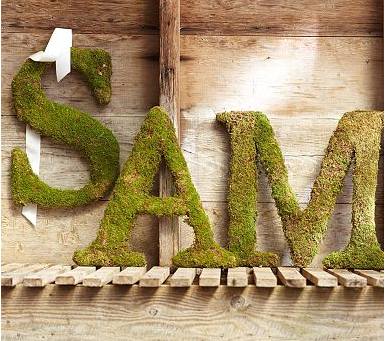
So for quite some time I have coveted these moss letters out of Pottery Barn, but at $79 per letter, pshha, that wasn't happening! Especially when I was certain I could make them myself for much less. And much less I did; I managed to pull it off for $4! Thank you $Tree! Score one for Ginger's pocket purse! Scroll on down to see how I did it!


Well unfortunately I am missing some pics, they have disappeared no-man's-land. But imagine if you will, I cut a H using my Cricut. Placed the the paper H on styrofoam I had left over from something that had come in the mail. Traced and outline of the H and began cutting. This was very laborious and would have been much easier had I had an electric knife. Once the H was cut out, what I should have done was wrap the whole letter in some burlap. I didn't and it came back to bite me later on.

Moss Sheets from Dollar Tree (used four sheets)

Using floral wire, I cut many, many sections of wires two inches long and bent them into U shapes.
I began cutting the moss sheets, fitting them together like a puzzle to fit over the H, sticking the U-shaped floral wire into thru them and into the Styrofoam to secure them.
Several sheets and lots of floral wire later, we had what you see in the above pics..
Here is where I wish I had wrapped it with burlap first, many of the joints showed white Styrofoam thru the moss. I took a bunch of crumbs of moss, mixed them with modgepodge and squished them into the cracks and crevices.
Once dried, I sprayed the whole thing with clear acrylic spray paint, several coats letting them dry in between coats.

And you can see, I am paying om age to Pottery Barn with a little recycled ribbon attached with hot glue. Below you can see the original image from Pottery Barn.
Note: Camera is not picking up true color. It's not quite as green as the PB version, but isn't as brown as what is appearing in pics. C'est la vie!


Enjoy!
ginger


Linking up to:


Wednesday, June 1, 2011

Furnished Apartment

Once upon a time I was in college, and once upon a time I rented a furnished apartment and once upon a time I moved out of the apartment and various random pieces of cheap read ugly furniture followed me. This brings me to this little gem. I think this is how it ended up in my basement. See Exhibit A:
Exhibit A

Now, I like a challenge and this one posed one. First, she was vertically challenged and second, she was made from the weird speckled wood that nobody knows what it really is made of.
Now to address the height issue; clearly a pair of heels would solve that problem. (It always solves mine!)  See Exhibit B.

Exhibit B: High Heels

plus

Exhibit C: T Nuts

Exhibit B will screw into Exhibit C says the man at Home Depot. Who knew? All you need to do is drill a hole into your wood and hammer the t-nuts into the wood and then your legs high heels will screw right into it. See examples below.


and


and

Wa-la


Now a few coats of Annie Sloan http://www.anniesloan.com/ chalk paint later and what we have folks is the following!


And


Enjoy,

ginger

Linking up to:
http://nv-craftenvy.blogspot.com/


Related Posts Plugin for WordPress, Blogger...